

Last year I set up push notifications on a WooCommerce store selling organic supplements. The owner had been running Facebook ads at $12/click and getting a 2.1% conversion rate. Good traffic, terrible retention — 94% of buyers never returned.
We installed Push Notification Plugin, configured a two-step opt-in prompt, and launched an abandoned cart sequence. In the first month, 1,840 visitors subscribed to push notifications. By month three, the subscriber list hit 4,200. That abandoned cart sequence — three notifications spaced at 30 minutes, 24 hours, and 72 hours — recovered $6,400 in revenue in a single month. The third notification, the one with a 5% discount code, drove 60% of the recovered sales.
Here’s what surprised me: the push notification CTR (click-through rate) on those cart reminders was 4.3%. The email cart abandonment sequence running at the same time? 1.1%. Push was outperforming email by nearly 4x on the same audience.
This guide covers the setup I use for WooCommerce push notifications, the automated campaigns that produce actual revenue, and the connection to loyalty programs that turn one-time push subscribers into long-term repeat buyers.
What Are WooCommerce Push Notifications?
Push notifications are short, clickable messages that pop up on a customer’s device — even when they’re not on your website. No app download needed. No email address required. The customer just clicks “Allow” on a browser prompt, and you can reach them anytime.
Think of it like this: email is a letter you drop in someone’s mailbox. They check it when they feel like it — maybe today, maybe Thursday. A push notification is a tap on the shoulder. It shows up on their screen right now.
WooCommerce doesn’t include push notifications by default. You need a third-party plugin or service to add them. The plugin handles the opt-in prompt, subscriber management, message delivery, and campaign automation.
According to PushPushGo’s 2025 analysis, web push campaigns generate 50% of their total clicks within 1 hour of sending — compared to email, where it takes 6.4 hours to reach half your openers. For time-sensitive messages like flash sales, restocks, or expiring loyalty points, push is the fastest channel available short of SMS.
If you’re looking for proven ways to grow through word-of-mouth, check out our guide: 50 Best Referral Program Examples
Why WooCommerce Push Notifications Are Worth Setting Up
I want to be upfront: push notifications aren’t magic. They won’t fix a broken product or a terrible checkout flow. But when your store is working and you need a channel that brings people back without paying for ads again, push is one of the highest-ROI tools available.
The numbers that convinced me:
- 85% of online stores now use push notifications — if you’re not, your competitors will beat you. (Sleeknote, 2026)
- Open rates range from 45-90% for web push, versus 15-25% for email (NotifyVisitors, 2025)
- 28% of users who click a push notification complete a purchase (NotifyVisitors, 2025)
Real example: A WooCommerce store using Push Notification Plugin set up browser abandonment, cart recovery, and price drop alerts. Result: repeat purchases increased 27%, with $38,000 in revenue attributed to PushEngage over the campaign period (PushEngage case study).
The link between push notifications and customer retention strategies is direct: push brings customers back to the store. A loyalty program gives them a reason to buy again once they arrive.
Related Read: How to Create a WooCommerce Loyalty Program?
Which Push Notification Plugin Should You Use?
Most guides skip this question. They pick one plugin and walk you through it. I’ve tested two, and the right choice depends on what else you’re running.
PushEngage – Best for stores that want a dedicated push with the deepest WooCommerce integration. Has pre-built cart abandonment, browse abandonment, and price drop campaigns with product variables ({{productname}}, {{price}}, {{bigimageurl}}) baked in. The free plan covers 200 subscribers. Growth plan ($8/month) unlocks triggered campaigns. This is what I use for most WooCommerce setups. 200,000+ active installs.
Omnisend – Best if you want push + email + SMS in one platform. Push notifications integrate directly into email automation workflows, so you can build sequences like “push at 30 min, email at 2 hours, SMS at 48 hours.” Free plan includes unlimited push, 500 emails/month, 250 contacts. Ovoko (auto parts store) used Omnisend push to generate 20% of their overall revenue with 2x email CTR.
My recommendation: If you’re running WooCommerce and want the fastest setup with the best eCommerce automations, start with PushEngage. If you already use Omnisend for email, add push there instead of running a separate tool.
This guide uses PushEngage for the tutorial. The strategy applies to any push service.
Bring them back with push—keep them with WPLoyalty.
What You’ll Need Before Starting
- WooCommerce 8.0+ on WordPress with an SSL certificate (HTTPS required — push notifications won’t work on HTTP)
- PushEngage account — free plan works for testing; Growth plan ($8/month) required for triggered campaigns like abandoned cart
- At least 5-10 published products for browse abandonment and back-in-stock campaigns
⏱️ Time estimate: 20-30 minutes to complete setup
How to Set Up WooCommerce Push Notifications Using PushEngage (Step-by-Step Guide)
Step 1: Install PushEngage
What you’re doing: Adding push notification functionality to your WooCommerce store.
Go to PushEngage.com and create an account. Enter your site URL and name during signup. Choose the free plan to start — you can upgrade later.
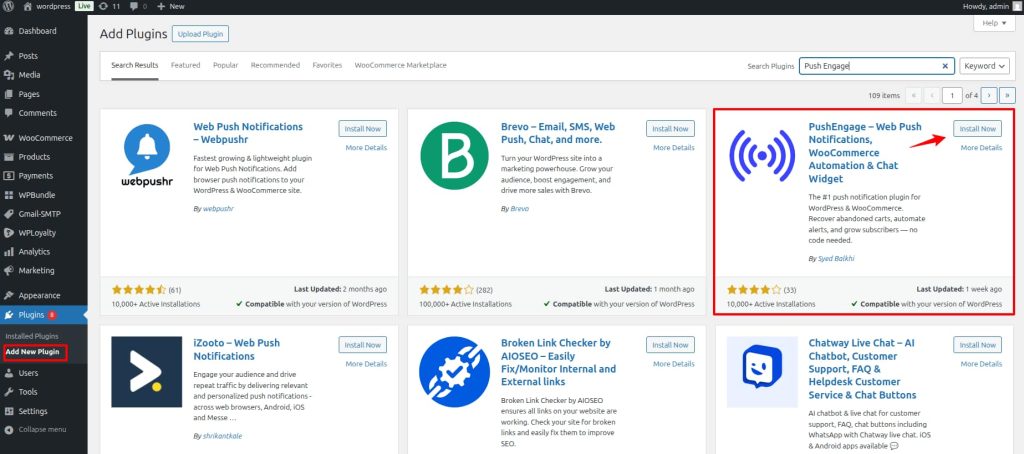
In your WordPress dashboard, go to Plugins → Add New. Search “PushEngage.” Install and activate it.
Step 2: Sign Up for PushEngage
Go to PushEngage.com and click Get Started. You can choose between the free plan (up to 200 subscribers) and paid plans depending on your needs.
Complete the signup form — enter your name, email, and website URL. Once registered, you’ll be asked to add your site details: site name, site URL, and site icon (your logo). Click Save and Continue when done.
Step 3: Connect PushEngage to Your WooCommerce Site
After activation, PushEngage will prompt you to connect your account. Select Connect your existing account, sign in, and choose your site name from the dropdown. Click Let’s Get Started.
You’ll see a success message when the connection is complete. PushEngage automatically installs the service worker file and configures the integration. If you want, you can click Configure Popup Modals to set up your opt-in prompt. Or click PushEngage Dashboard to continue from there.

Watch out for: If you see a “Service Worker Error,” the service-worker.js file didn’t reach your site’s root folder. Some managed hosting providers block root-level file creation.
If you’re also troubleshooting site speed during setup, our best WordPress cache plugins guide covers caching tools.
Step 4: Configure the Opt-In Popup
Go to PushEngage → Design → Popup Modals in your WordPress sidebar.
You’ll see several opt-in prompt styles: Single Step Optin, Safari Style Box, Floating Bar, Bell Widget, and more. I recommend the Safari Style Box (two-step opt-in). It shows your custom message first, then triggers the browser permission prompt only if the visitor clicks “Allow.” This prevents permanent blocks from accidental “Block” clicks.
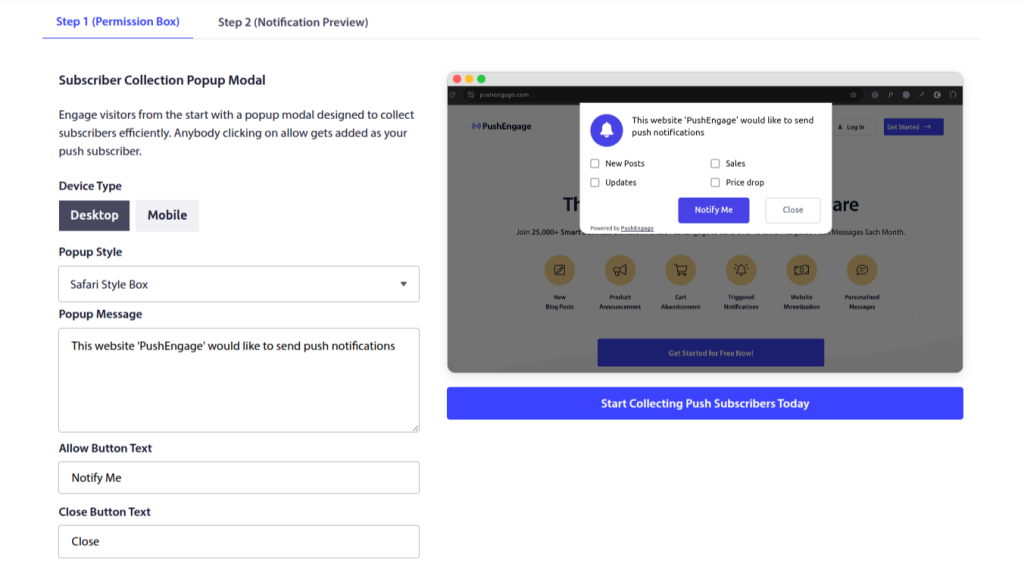
Customize the message — something like: “Get notified about exclusive deals, restocks, and flash sales.” Set the delay to 8 seconds and the frequency to show again after 3 days if dismissed. Save.
The opt-in popup works in the same space as loyalty program widgets. If you’re running WPLoyalty’s launcher widget on your store, make sure the push prompt and the loyalty widget don’t overlap visually — position them on opposite corners of the screen.
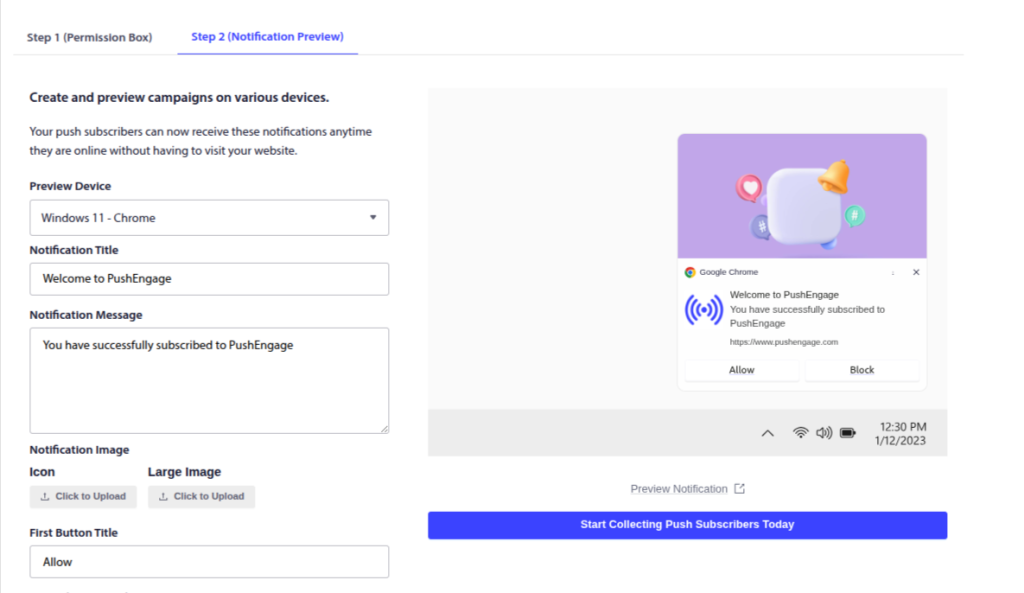
Step 5: Create and Send Your First Push Notification
From your WordPress dashboard, go to PushEngage → Push Broadcasts → Create New Push Broadcast.
Enter the following:
- Notification Title — keep it under 50 characters
- Message — keep it under 100 characters URL — the page you want to send subscribers to
- Icon Image — your logo
- Large Image — toggle ON and upload a product image or sale banner
You’ll see a live preview on the right showing how the notification looks across Chrome, Safari, Android, and iOS.
Click Save & Select Audience. Choose Send to All Subscribers (or pick a specific segment if you’ve created one). Then click Send/Schedule.
Watch out for: Always click Test Notification before sending to your full list. This sends the notification only to your own device so you can verify the title, message, image, and link all look correct. I’ve caught cropped images and broken URLs this way before they went to thousands of subscribers.
Tip: Instead of generic sale blasts, try sending notifications about loyalty point milestones (“You’re 50 points from a $10 reward!”) or birthday rewards (“Happy Birthday — we added $10 credit to your account”). These feel like service, not marketing.
Verify It’s Working
Before relying on push as a channel, run these checks:
- Subscribe yourself — Visit your store in incognito, accept the prompt, confirm you receive the welcome notification within 60 seconds
- Test abandoned cart — Add a product, close the tab, wait 30-35 minutes. Confirm the notification arrives with the correct product name and image.
- Check subscriber count — In PushEngage dashboard, verify the number increases as visitors opt in. If it stays at zero after 24 hours, check your SSL certificate and service worker file.
- Test on mobile — Subscribe on your phone’s browser. Confirm notifications display correctly — some themes cause formatting issues on mobile.
Pro tip: Send a test broadcast to only yourself before blasting your full list. On my first broadcast, the image I uploaded was too large and cropped awkwardly on Android. Testing caught it before 3,000 subscribers saw a half-visible product photo.
5 WooCommerce Push Notification Mistakes (And How to Avoid Them)
Mistake #1: Using the single-step opt-in prompt
The browser’s native “Allow/Block” prompt gives you one shot. If a visitor clicks Block — maybe by accident, maybe because they didn’t understand the context — they’ve permanently blocked your site. You cannot re-trigger that prompt. Ever. On that browser, on that device, that subscriber is lost.
The two-step approach adds a custom popup first. If they dismiss it, you show it again in 3-7 days. Always use two-step.
Mistake #2: Sending daily promotional broadcasts
I watched a client send a new sale notification every single day for two weeks. Their unsubscribe rate hit 18% in that period alone. PushPushGo data shows unsubscribes stay under 1% at up to 5 per day — but that’s an aggregate across industries. For eCommerce, 2-3 per week is the practical ceiling. Schedule your best promotions and skip the filler.
Mistake #3: Writing generic notification copy
“Check out our latest deals!” gets ignored. “Your size in the Nike Air Max 90 just dropped to $89” gets clicked. The difference is specificity. Use product names, prices, and deadlines. Rich notifications with images get 33% higher engagement than plain text — never send a text-only broadcast for eCommerce.
Mistake #4: Treating push as an ads channel instead of a retention channel
Push notifications aren’t just for driving sales today. Use them to tell customers when their loyalty points are close to a reward: “You’re 50 points away from a $10 reward — shop now to earn them.” Notify them about VIP tier upgrades: “Congrats! You’ve reached Gold status. Your exclusive perks are live.” These service-oriented messages build trust and keep subscribers engaged without feeling like ads.
Mistake #5: Never cleaning your subscriber list
Subscribers who haven’t clicked any notification in 90+ days drag down your engagement metrics. Low engagement can cause push services to throttle your delivery to ALL subscribers. Create a re-engagement campaign: “We miss you — here’s 15% off your next order.”
If they don’t respond within 7 days, let them go. A smaller, active list always outperforms a large, dormant one. The same principle applies to reducing eCommerce churn.
Related Read: Why Customers Ghost You After Buying Once
Advanced Push Notification Tips
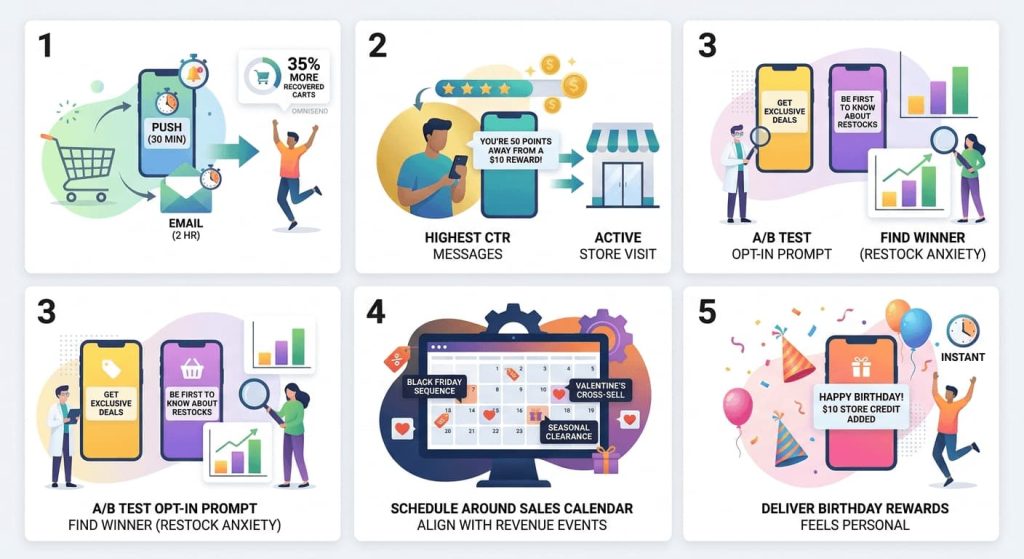
Tip 1: Stack push with email for abandoned cart recovery. Send push at 30 minutes, email at 2 hours. Push catches them in real time. Email catches them when they check their inbox. On the supplement store, running both channels recovered 35% more carts than email alone. Omnisend users see similar results with their combined workflows.
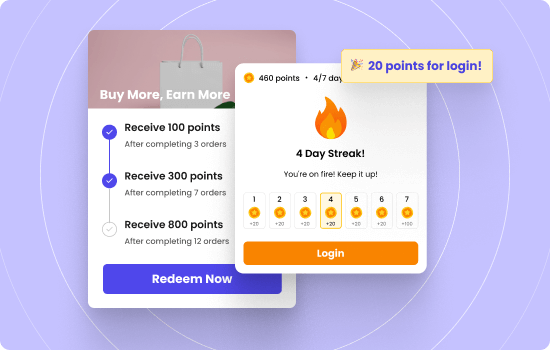
Tip 2: Use push to announce loyalty point milestones. “You’re 50 points away from a $10 reward!” is one of the highest-CTR messages you can send. With WPLoyalty’s points system, you know exactly when a customer is close to a reward threshold. A well-timed push at that moment turns a passive points balance into an active store visit.
Tip 3: A/B test your opt-in prompt message. “Get exclusive deals” vs “Never miss a flash sale” vs “Be first to know about restocks.” I tested all three on a home goods store. “Be first to know about restocks” won with a 9.4% opt-in rate — 2.3 percentage points higher than the runner-up. Restock anxiety was the specific pain point for that audience. Test what resonates with yours.
Tip 4: Schedule notifications around your sale calendar, not your content calendar. Plan your Black Friday push sequence, Valentine’s Day cross-sell, and seasonal clearance weeks in advance. PushEngage lets you schedule broadcasts for future dates. The stores that perform best with push aren’t sending random promotions — they’re aligning every notification with a specific revenue event.
Tip 5: Use push for birthday reward delivery. “Happy Birthday! We’ve added $10 store credit to your account.” Push delivers this the instant it’s relevant — unlike email, which might sit unread until the birthday is over. Birthday pushes feel personal in a way that promotional pushes never can.
Real-World Push Notification Results
Example 1: $38,000 in revenue from PushEngage automations
A WooCommerce store set up three PushEngage automations: browse abandonment, cart recovery, and price drop alerts. They also ran recurring drip campaigns for accessory bundles. Over the campaign period, repeat purchases increased 27% and $38,000 in total revenue was attributed directly to PushEngage.
The majority came from automated sequences, not manual broadcasts — which tracks with CleverTap’s data showing automations drive 28% of push-attributed orders from only 5% of total sends.
Example 2: Supplement store — $6,400/month from abandoned cart push
This is the store I described in the introduction. Key details: average order value was $52. The subscriber list was 4,200 after 3 months. The 3-notification sequence (30 min → 24 hr → 72 hr with 5% discount) recovered an average of 123 orders per month. At $52 AOV, that’s $6,396/month.
The breakthrough was Notification 3 — the one with the discount code. It produced 60% of recovered sales. Without it, the sequence recovered roughly $2,500/month. The discount effectively tripled the recovery rate for an additional 5% margin cost on those specific orders.
Convert returning visitors into loyal customers with WPLoyalty.
What to Do Next
You have push notifications running. Subscribers are building. Abandoned carts are being recovered. But push alone is a channel, not a system.
Loyalty programs boost retention 15-35% when paired with marketing channels like push (Marketing LTB, 2025).
With WPLoyalty, you use push notifications to announce point milestones, birthday rewards, tier upgrades, and point expirations. Every notification reinforces the loyalty loop: buy → earn → redeem → buy again.
🔷 Install WPLoyalty free and set up your first loyalty campaign — award points for every purchase, review, or referral. It takes under 10 minutes. Then use push notifications to remind customers when they’re close to a reward.
Keep Reading:
- Best WooCommerce Subscription Plugins for 2026
- How to Increase WooCommerce Customer Loyalty
- Best WooCommerce Discount Plugins
- 50 Best Places to Get Birthday Freebies
Frequently Asked Questions
No. Web push works through the browser — Chrome, Firefox, Edge, Safari. No app needed. Visitors click “Allow” on a browser prompt and receive notifications on desktop and mobile through their browser.
PushEngage for dedicated push with the deepest WooCommerce integration. Omnisend if you want push + email + SMS in one platform. OneSignal for developer-level control and unlimited free subscribers. I use PushEngage for most WooCommerce stores because the pre-built cart abandonment and browse abandonment templates save hours of setup.
2-3 promotional broadcasts per week maximum. Automated campaigns (abandoned cart, back-in-stock) don’t count — they’re triggered by customer behavior, not your schedule. Automated pushes account for only 5% of sends but drive 28% of orders.
Yes. Use push to announce point milestones (“You’re 50 points from a reward!”), loyalty level upgrades, and expiring points. WPLoyalty tracks all of this. The launcher widget keeps loyalty visible on-site between push notifications.
They’ve permanently blocked your site on that browser. There’s no way to re-ask. This is why I always use a two-step opt-in — the custom popup first, browser prompt second. If they dismiss your popup, you can try again in 3-7 days without triggering a permanent block.
Yes, if you collect consent properly. The browser “Allow” prompt counts as consent. Include push notifications in your privacy policy — what you send, how to unsubscribe. PushEngage and OneSignal include GDPR-compliant opt-in flows by default.
Track three metrics: subscriber growth (5-15% of visitors should opt in monthly), CTR (0.84% average for broadcasts, 5-8% for automated campaigns), and revenue attributed to push (your push platform tracks this).

